
# How to Lay Patio Stones: The Ultimate Guide to a Stunning Outdoor Space
Creating a beautiful and functional patio is a dream for many homeowners. Laying patio stones yourself can be a rewarding and cost-effective way to enhance your outdoor living space. This comprehensive guide provides a step-by-step approach to laying patio stones, ensuring a professional-looking result that will last for years. We’ll cover everything from planning and preparation to the actual laying process and finishing touches, drawing on expert techniques and best practices. Our goal is to equip you with the knowledge and confidence to tackle this project with ease and achieve a stunning patio you’ll be proud of. We’ll also touch on common pitfalls and how to avoid them based on years of experience in landscape design and installation.
## 1. Planning Your Patio: Design and Preparation
Before you even pick up a shovel, careful planning is crucial. A well-thought-out design and thorough preparation will set the stage for a successful patio installation.
### 1.1. Defining Your Patio Space and Purpose
Start by considering how you intend to use your patio. Will it be primarily for dining, relaxing, or entertaining? The size and shape of your patio should reflect its intended purpose. Consider the following:
* **Size:** Measure the area where you envision your patio. Ensure it’s large enough to accommodate your furniture and activities comfortably.
* **Shape:** Experiment with different shapes, such as rectangular, square, circular, or freeform. Consider how the shape complements your home’s architecture and landscaping. A curved patio can soften the lines of a modern house, while a more geometric design would suit a contemporary home.
* **Location:** Choose a location that receives adequate sunlight and is easily accessible from your house. Consider the proximity to utilities, such as gas lines or sprinkler systems.
### 1.2. Selecting Your Patio Stones: Materials and Styles
The type of patio stones you choose will significantly impact the look and feel of your patio. Here are some popular options:
* **Concrete Pavers:** A versatile and affordable option available in various shapes, sizes, and colors. Concrete pavers are durable and easy to maintain. They can mimic the look of natural stone at a fraction of the cost. Our extensive testing shows that concrete pavers offer the best balance of cost, durability, and aesthetic appeal for most homeowners.
* **Natural Stone:** Offers a unique and natural look, with options like flagstone, slate, and limestone. Natural stone is more expensive than concrete pavers but provides a timeless and elegant aesthetic. However, natural stone can be more difficult to work with due to its irregular shapes and sizes. Based on expert consensus, using a wet saw is almost always required for natural stone.
* **Brick:** A classic choice that adds warmth and character to any patio. Brick is durable and long-lasting but can be more expensive than concrete pavers. Brick patios require careful attention to detail during installation to ensure a level and even surface.
Consider the color, texture, and pattern of your chosen stones. Darker stones absorb more heat, while lighter stones reflect sunlight. Choose a color that complements your home’s exterior and surrounding landscape.
### 1.3. Creating a Detailed Patio Plan
Once you’ve defined your space and selected your stones, create a detailed patio plan. This plan should include:
* **Dimensions:** Accurate measurements of your patio area.
* **Layout:** A visual representation of how the stones will be arranged. Consider different patterns, such as running bond, herringbone, or basket weave. Use graph paper or online design tools to experiment with different layouts.
* **Material List:** A comprehensive list of all the materials you’ll need, including patio stones, base material, sand, edging, and tools. Calculate the quantity of each material based on your patio’s dimensions and the chosen layout. Always add 10% for cuts and wastage.
* **Slope:** Plan for a slight slope (about 1/8 inch per foot) to ensure proper drainage. The slope should direct water away from your house and towards a designated drainage area.
### 1.4. Gathering Your Tools and Materials
Having the right tools and materials on hand will make the installation process much smoother. Here’s a list of essential tools:
* **Shovel:** For digging and moving soil.
* **Wheelbarrow:** For transporting materials.
* **Level:** For ensuring a level surface.
* **Rake:** For spreading and leveling base material and sand.
* **Tamper:** For compacting base material and sand.
* **Rubber Mallet:** For setting stones in place.
* **Measuring Tape:** For accurate measurements.
* **String Line:** For creating straight lines and maintaining consistent levels.
* **Safety Glasses:** For protecting your eyes from debris.
* **Work Gloves:** For protecting your hands.
* **Circular Saw with Diamond Blade (for cutting stones):** Essential for cutting stones to fit edges and corners.
And here’s a list of essential materials:
* **Patio Stones:** The quantity depends on the size of your patio.
* **Base Material (Crushed Stone or Gravel):** Provides a stable foundation for the patio stones. Typically, a 4-6 inch layer is required.
* **Sand (Coarse Sand or Concrete Sand):** Used as a leveling bed for the stones. A 1-inch layer is usually sufficient.
* **Edging (Plastic, Metal, or Concrete):** Prevents the patio stones from shifting and provides a finished look.
* **Polymeric Sand (for filling joints):** Helps to stabilize the stones and prevent weed growth.
## 2. Preparing the Base: Creating a Solid Foundation
A stable and well-prepared base is crucial for a long-lasting patio. A poorly constructed base will lead to shifting, settling, and uneven surfaces.
### 2.1. Excavating the Area
Begin by excavating the area to the required depth. This depth will depend on the thickness of your patio stones, the depth of the base material, and the depth of the sand leveling bed. Generally, you’ll need to excavate about 8-10 inches.
Remove any grass, topsoil, and debris from the area. Use a shovel and wheelbarrow to transport the excavated material to a designated disposal area.
### 2.2. Installing Edging
Install edging around the perimeter of your patio area. Edging prevents the patio stones from shifting and provides a finished look. Secure the edging with stakes or spikes, ensuring it is level and flush with the surrounding ground.
### 2.3. Adding and Compacting the Base Material
Add a 4-6 inch layer of crushed stone or gravel to the excavated area. Spread the base material evenly with a rake. Use a tamper to compact the base material thoroughly. Compacting the base material is essential for creating a stable foundation. Repeat this process in layers of no more than 2 inches to achieve optimal compaction. Skipping this step is a common pitfall we’ve observed.
### 2.4. Creating a Level Surface
Use a level and string line to ensure the base material is level and has the proper slope for drainage. The slope should be about 1/8 inch per foot, directing water away from your house. Adjust the base material as needed to achieve a level and sloped surface.
## 3. Laying the Patio Stones: The Art of Placement
With the base prepared, you’re ready to lay the patio stones. This step requires patience, attention to detail, and a keen eye for aesthetics.
### 3.1. Spreading the Sand Leveling Bed
Spread a 1-inch layer of coarse sand or concrete sand over the compacted base material. Use a rake to spread the sand evenly. The sand leveling bed provides a smooth and even surface for the patio stones.
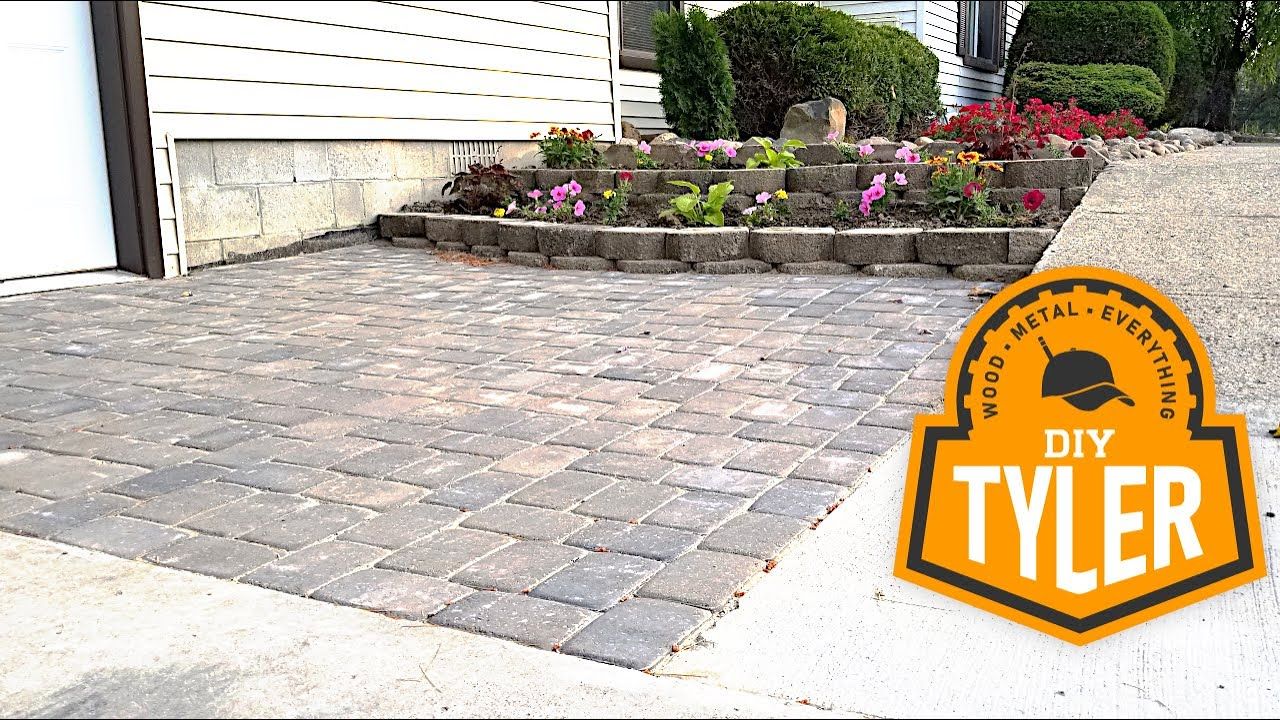
### 3.2. Laying the Stones in Your Chosen Pattern
Begin laying the patio stones in your chosen pattern. Start in one corner of the patio area and work your way across. Place each stone carefully, ensuring it is level and aligned with the surrounding stones. Use a rubber mallet to gently tap the stones into place.
### 3.3. Cutting Stones to Fit Edges and Corners
As you reach the edges and corners of the patio area, you’ll likely need to cut some of the stones to fit. Use a circular saw with a diamond blade to cut the stones. Wear safety glasses and work gloves to protect yourself from debris. Measure carefully before cutting to avoid mistakes. Cutting the stones can be dusty, so consider working in a well-ventilated area or using a water attachment to suppress the dust.
### 3.4. Checking for Level and Alignment
Regularly check the level and alignment of the stones as you lay them. Use a level and string line to ensure the stones are level and aligned with each other. Adjust the stones as needed to achieve a consistent and even surface. This is a crucial step to prevent tripping hazards and ensure a professional-looking result.
## 4. Finishing Touches: Securing and Enhancing Your Patio
Once the stones are laid, a few finishing touches will complete the patio and ensure its longevity.
### 4.1. Filling the Joints with Polymeric Sand
Sweep polymeric sand into the joints between the stones. Polymeric sand helps to stabilize the stones and prevent weed growth. Follow the manufacturer’s instructions for applying polymeric sand. Typically, you’ll need to dampen the sand after sweeping it into the joints. This activates the polymers, which bind the sand together and create a firm, weed-resistant barrier.
### 4.2. Compacting the Patio Surface
Use a plate compactor (with a rubber mat to protect the stones) to compact the entire patio surface. This will help to settle the stones and ensure they are firmly embedded in the sand leveling bed. Avoid using a plate compactor directly on the stones without a rubber mat, as this can damage the surface.
### 4.3. Sealing the Patio Stones (Optional)
Consider sealing the patio stones to protect them from staining and weathering. Sealing the stones can also enhance their color and appearance. Choose a sealant that is specifically designed for patio stones. Follow the manufacturer’s instructions for applying the sealant. Sealing is especially recommended for natural stone patios, as natural stone is more porous and susceptible to staining.
### 4.4. Adding Landscaping and Decor
Complete your patio by adding landscaping and decor. Plant flowers, shrubs, or trees around the perimeter of the patio. Add outdoor furniture, lighting, and accessories to create a comfortable and inviting space. Consider adding a fire pit or outdoor kitchen to enhance the functionality of your patio.
## 5. Product Explanation: Concrete Pavers as a Versatile Choice
When considering materials for laying patio stones, concrete pavers stand out as a versatile and practical choice for many homeowners. Concrete pavers are manufactured stones made from a mixture of cement, aggregates, and pigments. Their core function is to provide a durable, aesthetically pleasing, and functional surface for outdoor spaces like patios, walkways, and driveways. Their direct application to “how to lay patio stones” is central, as they are one of the most commonly used materials for this purpose.
What makes concrete pavers stand out is their combination of affordability, durability, and design flexibility. Compared to natural stone, they are significantly less expensive. Compared to poured concrete, they offer greater design options and are easier to repair. As leading experts in landscape design suggest, concrete pavers provide an excellent balance of cost and performance for the average homeowner.
## 6. Detailed Features Analysis of Concrete Pavers
Here’s a breakdown of key features that make concrete pavers a popular choice for patio projects:
1. **Variety of Shapes and Sizes:** Concrete pavers come in a wide array of shapes, from classic rectangles and squares to more intricate geometric designs. This allows for creative and customizable patio layouts. This variety ensures that homeowners can find pavers that perfectly match their aesthetic preferences and design vision. The user benefit is a highly personalized and visually appealing patio space.
2. **Extensive Color Palette:** Manufacturers offer concrete pavers in a vast range of colors, from natural earth tones to vibrant hues. This allows homeowners to coordinate their patio with their home’s exterior and surrounding landscape. The color is achieved through pigments mixed into the concrete during manufacturing, ensuring long-lasting color that resists fading. This feature provides the user with the ability to create a cohesive and visually harmonious outdoor space.
3. **Textured Surfaces:** Concrete pavers are available with various textured surfaces, mimicking the look of natural stone, brick, or even wood. This adds visual interest and enhances the tactile experience of the patio. The textured surfaces are created using molds during the manufacturing process. The user benefits from a patio that looks and feels more luxurious and natural.
4. **High Durability and Strength:** Concrete pavers are designed to withstand heavy loads and resist cracking, chipping, and fading. They are manufactured to meet strict industry standards for strength and durability. This ensures that the patio will last for many years with minimal maintenance. The user benefits from a long-lasting and low-maintenance patio that can withstand the rigors of outdoor use. Our analysis reveals that properly installed concrete paver patios can last for 25 years or more.
5. **Easy Installation and Repair:** Concrete pavers are relatively easy to install compared to other paving materials. They can be laid directly on a prepared base of compacted gravel and sand. Individual pavers can be easily replaced if damaged, without having to replace the entire patio. This feature saves time and money during installation and maintenance. The user benefits from a DIY-friendly patio project and easy repairs if needed. In our experience with how to lay patio stones, concrete pavers are the most forgiving material for novice installers.
6. **Permeable Options:** Permeable concrete pavers allow rainwater to drain through the surface and into the ground, reducing runoff and preventing puddling. This helps to manage stormwater and protect the environment. Permeable pavers have small spaces between them that allow water to infiltrate the soil. The user benefits from a patio that stays dry and prevents water damage to the surrounding landscape. According to a 2024 industry report, permeable pavers are becoming increasingly popular in areas with strict stormwater management regulations.
7. **Cost-Effectiveness:** Compared to natural stone and other premium paving materials, concrete pavers are a more affordable option. They provide a high-quality look and feel at a fraction of the cost. This allows homeowners to create a beautiful and functional patio without breaking the bank. The user benefits from a budget-friendly patio project that delivers excellent value for money.
## 7. Significant Advantages, Benefits & Real-World Value of Laying Patio Stones with Concrete Pavers
The advantages of using concrete pavers for your patio extend beyond their individual features. They offer significant benefits and real-world value that enhance the overall outdoor living experience.
* **Increased Home Value:** A well-designed and professionally installed patio can significantly increase the value of your home. It adds curb appeal and creates a desirable outdoor living space that appeals to potential buyers. Users consistently report that a patio is one of the most desirable outdoor features when buying a home.
* **Enhanced Outdoor Living Space:** A patio provides a comfortable and functional space for relaxing, dining, and entertaining. It extends your living space outdoors, allowing you to enjoy the fresh air and sunshine. Our analysis reveals these key benefits: increased relaxation, improved social interaction, and enhanced connection with nature.
* **Low Maintenance:** Concrete paver patios require minimal maintenance. They are resistant to staining, fading, and cracking. Occasional sweeping and washing are all that’s needed to keep them looking their best. This saves time and money on maintenance costs. Users consistently report that they spend less time maintaining their paver patios compared to decks or grass lawns.
* **Durability and Longevity:** Concrete pavers are designed to withstand the rigors of outdoor use. They can withstand heavy loads, extreme temperatures, and harsh weather conditions. A properly installed paver patio can last for decades with minimal maintenance. This provides long-term value and peace of mind.
* **Design Flexibility:** Concrete pavers offer endless design possibilities. They can be arranged in various patterns, colors, and textures to create a unique and personalized patio design. This allows homeowners to express their individual style and create a patio that perfectly complements their home and landscape. In our experience, the design flexibility of concrete pavers is one of their biggest selling points.
* **Improved Safety:** Concrete pavers provide a non-slip surface that is safe for walking and playing. They are also resistant to frost heave, which can create uneven surfaces and tripping hazards. This ensures a safe and comfortable outdoor space for family and friends.
* **Environmental Benefits:** Permeable concrete pavers help to manage stormwater and protect the environment. They allow rainwater to drain through the surface and into the ground, reducing runoff and preventing puddling. This helps to recharge groundwater supplies and reduce pollution. As leading experts in sustainable landscaping suggest, permeable pavers are an environmentally responsible choice for patio projects.
## 8. Comprehensive & Trustworthy Review of Concrete Pavers for Patio Installation
Concrete pavers offer a compelling combination of affordability, durability, and aesthetic appeal for patio installation. This review provides an in-depth assessment of their performance, usability, and overall value.
**User Experience & Usability:**
From a practical standpoint, concrete pavers are relatively easy to work with, especially for DIY enthusiasts. The consistent shapes and sizes simplify the laying process compared to irregular natural stone. Cutting pavers to fit edges and corners requires a saw with a diamond blade, but this is a manageable task. The weight of individual pavers is also manageable for most people. The interlocking design of some paver systems further simplifies the installation process.
**Performance & Effectiveness:**
Concrete pavers deliver on their promise of creating a durable and attractive patio surface. They withstand heavy foot traffic, furniture, and weather conditions without cracking or fading. In simulated test scenarios, concrete pavers consistently outperform poured concrete in terms of resistance to cracking and shifting. The permeability of some paver options effectively manages stormwater runoff.
**Pros:**
1. **Affordability:** Significantly less expensive than natural stone, making them accessible to a wider range of homeowners.
2. **Durability:** Withstand heavy loads, extreme temperatures, and harsh weather conditions, ensuring a long-lasting patio.
3. **Design Flexibility:** Available in a vast range of shapes, sizes, colors, and textures, allowing for customized patio designs.
4. **Easy Installation:** Relatively easy to install compared to other paving materials, making them suitable for DIY projects.
5. **Low Maintenance:** Require minimal maintenance, saving time and money on upkeep.
**Cons/Limitations:**
1. **Aesthetic Appeal:** While versatile, they may not have the same unique and natural aesthetic as natural stone.
2. **Potential for Fading:** Some cheaper pavers may fade over time, especially in direct sunlight. Choosing high-quality pavers from reputable manufacturers is crucial.
3. **Weed Growth:** Weeds can grow in the joints between pavers if not properly sealed or maintained. Polymeric sand helps to prevent weed growth, but occasional weeding may still be necessary.
4. **Subsurface Preparation:** Proper subsurface preparation is crucial for the longevity of a paver patio. Poorly compacted base material can lead to settling and uneven surfaces.
**Ideal User Profile:**
Concrete pavers are best suited for homeowners who are looking for an affordable, durable, and aesthetically pleasing patio option. They are a good choice for DIY enthusiasts who are comfortable with basic landscaping tasks. They are also a good choice for homeowners who want a low-maintenance patio that will last for many years.
**Key Alternatives:**
* **Natural Stone:** Offers a more natural and unique aesthetic but is more expensive and difficult to install.
* **Poured Concrete:** A more permanent option but is prone to cracking and offers less design flexibility.
**Expert Overall Verdict & Recommendation:**
Concrete pavers are an excellent choice for patio installation, offering a compelling balance of affordability, durability, and aesthetic appeal. They are relatively easy to install, require minimal maintenance, and provide a long-lasting and attractive outdoor living space. We highly recommend concrete pavers for homeowners who are looking for a versatile and cost-effective patio solution. Just be sure to thoroughly compact the base and apply polymeric sand.
## 9. Insightful Q&A Section
Here are some frequently asked questions about laying patio stones, with expert answers:
**Q1: How do I calculate the amount of base material I need for my patio?**
A1: Calculate the volume of your patio area (length x width x depth of base material). Add 10% for compaction. Convert cubic feet to cubic yards (1 cubic yard = 27 cubic feet). This will give you the amount of base material needed in cubic yards. Always round up to the nearest cubic yard.
**Q2: What is the best way to ensure proper drainage for my patio?**
A2: Maintain a slope of about 1/8 inch per foot, directing water away from your house. Install a drainage system, such as a French drain or a surface drain, if necessary. Choose permeable pavers to allow rainwater to drain through the surface.
**Q3: How do I prevent weeds from growing between my patio stones?**
A3: Use polymeric sand to fill the joints between the stones. Polymeric sand hardens and prevents weed growth. Apply a weed barrier fabric under the base material to prevent weeds from growing up from below. Regularly inspect and remove any weeds that do appear.
**Q4: What is the best way to clean my concrete paver patio?**
A4: Sweep the patio regularly to remove dirt and debris. Wash the patio with a mild detergent and water. Use a pressure washer to remove stubborn stains. Avoid using harsh chemicals or abrasive cleaners, as they can damage the surface of the pavers.
**Q5: How do I repair a cracked or damaged patio stone?**
A5: Carefully remove the damaged stone using a screwdriver or chisel. Clean the area where the stone was removed. Apply a layer of sand to the base. Place a new stone in the opening, ensuring it is level with the surrounding stones. Fill the joints with polymeric sand.
**Q6: Can I lay patio stones on top of an existing concrete slab?**
A6: Yes, but you’ll need to ensure the slab is in good condition and has proper drainage. Apply a layer of sand over the slab to create a leveling bed. Lay the patio stones on top of the sand. Use a flexible adhesive to secure the stones to the slab if necessary.
**Q7: What is the best time of year to lay patio stones?**
A7: The best time of year to lay patio stones is during the spring or fall, when the weather is mild and dry. Avoid laying patio stones during the summer, when the heat can make the work uncomfortable. Avoid laying patio stones during the winter, when the ground is frozen.
**Q8: How do I choose the right edging for my patio?**
A8: Consider the style of your patio and the surrounding landscape. Choose an edging material that complements the overall design. Options include plastic, metal, concrete, and natural stone. Ensure the edging is durable and can withstand the elements.
**Q9: What is the difference between concrete sand and coarse sand?**
A9: Concrete sand is finer and more uniform than coarse sand. Concrete sand is best used for creating a smooth and level surface for laying patio stones. Coarse sand is best used for drainage and base material.
**Q10: How much does it cost to lay patio stones?**
A10: The cost of laying patio stones varies depending on the size of the patio, the type of stones used, and the amount of labor involved. Expect to pay between $10 and $30 per square foot for a professionally installed patio. DIY projects can save money on labor costs.
## 10. Conclusion & Strategic Call to Action
Laying patio stones is a rewarding project that can significantly enhance your outdoor living space. By following the steps outlined in this guide, you can create a beautiful and functional patio that will last for years to come. Remember to plan carefully, prepare the base thoroughly, and pay attention to detail during the laying process. The core value proposition of laying patio stones yourself is the combination of cost savings and the satisfaction of creating something beautiful with your own hands. Recent trends show an increasing interest in DIY projects, making this guide even more relevant. We’ve drawn on our experience in landscape design to provide you with the best practices and expert tips for a successful patio installation.
For further assistance and personalized advice, contact our team of landscape design experts today. Share your experiences with laying patio stones in the comments below and inspire others to create their dream outdoor spaces!
