
How to Do Henna Tattoos Yourself: A Comprehensive Guide
Want to adorn your skin with beautiful, temporary art? Learning how to do henna tattoos yourself opens up a world of creative expression. This comprehensive guide provides everything you need to know, from selecting the right materials to mastering application techniques. We’ll cover safety precautions, design inspiration, and aftercare tips to ensure stunning and long-lasting results. Forget expensive salon visits – with our expert advice, you can create captivating henna designs in the comfort of your own home. Whether you’re a beginner or have some experience, this guide will elevate your henna artistry.
Understanding Henna and Its Applications
Henna, derived from the *Lawsonia inermis* plant, has been used for centuries for body art, hair dyeing, and even medicinal purposes. The leaves of the henna plant contain a dye molecule called lawsone, which binds to proteins, resulting in a reddish-brown stain on the skin. When learning how to do henna tattoos yourself, it’s crucial to understand the different types of henna and their safety implications.
Types of Henna
* **Natural Henna:** This is pure henna powder made from dried and ground henna leaves. It produces a reddish-brown stain and is generally considered safe for skin application. Always opt for natural henna when you’re learning how to do henna tattoos yourself.
* **Black Henna:** This is henna that has been adulterated with a chemical dye called paraphenylenediamine (PPD). Black henna can cause severe allergic reactions, permanent scarring, and long-term health problems. *Never* use black henna.
* **Neutral Henna:** This is not actually henna at all. It’s often made from a different plant and doesn’t stain the skin. It’s sometimes used as a hair conditioner.
The Cultural Significance of Henna
Henna holds deep cultural significance in many parts of the world, particularly in South Asia, the Middle East, and Africa. It’s often used in wedding ceremonies, festivals, and other celebrations. The intricate designs are not merely decorative but also carry symbolic meanings, representing blessings, good fortune, and protection. Understanding this cultural context adds another layer of appreciation to the art of how to do henna tattoos yourself.
Gathering Your Supplies: The Essential Henna Kit
Before you embark on your henna journey, you need to assemble the right tools and materials. A well-stocked henna kit will make the process smoother and more enjoyable. Here’s a list of essential supplies:
* **Natural Henna Powder:** Choose high-quality, finely sifted henna powder. Look for reputable suppliers who guarantee the purity of their product.
* **Essential Oils:** Certain essential oils, such as lavender, cajeput, or tea tree oil, enhance the staining power of henna. These oils contain monoterpenes, which help the lawsone molecules bind to the skin. Using the right essential oil is a key element in how to do henna tattoos yourself successfully.
* **Lemon Juice or Tea:** These acidic liquids help to release the dye from the henna powder. Lemon juice is more potent, while tea provides a gentler option.
* **Sugar:** Adding sugar to the henna paste makes it smoother and more pliable, allowing for finer lines and intricate designs.
* **Applicator Bottles or Cones:** These are used to apply the henna paste to the skin. You can purchase pre-made cones or create your own using cellophane or plastic sheets.
* **Applicator Tips:** Variety of tips for different line thicknesses.
* **Transfer Paper:** If you are not comfortable with freehand, transfer paper is a great tool.
* **Stencils:** A great option for beginners.
* **Cotton Balls or Swabs:** For cleaning up mistakes and applying aftercare solutions.
* **Paper Towels:** For general cleanup.
* **Gloves:** To protect your hands from staining.
* **Sealing Solution:** A mixture of lemon juice and sugar to keep the henna paste moist and in contact with the skin for longer.
Preparing the Henna Paste: The Heart of the Process
Creating the perfect henna paste is crucial for achieving a rich, dark stain. The consistency of the paste should be smooth and creamy, similar to toothpaste. Here’s a step-by-step guide to preparing your henna paste:
1. **Sift the Henna Powder:** This removes any clumps or impurities, ensuring a smooth paste. Use a fine-mesh sieve for best results.
2. **Mix the Liquids:** In a glass bowl, combine the lemon juice or tea with the essential oil. The amount of liquid will depend on the consistency of your henna powder. Start with a small amount and gradually add more until you achieve the desired consistency.
3. **Add the Henna Powder:** Slowly add the sifted henna powder to the liquid mixture, stirring continuously to prevent lumps from forming.
4. **Add the Sugar:** Mix in the sugar. This will make the paste more pliable.
5. **Knead the Paste:** Use a spoon or your hands (wearing gloves) to knead the paste until it is smooth and creamy. There should be no lumps or dry spots.
6. **Let it Rest (Dye Release):** Cover the bowl with plastic wrap and let the paste rest at room temperature for 12-24 hours. This allows the lawsone molecules to be released from the henna powder, maximizing the staining power.
7. **Check for Dye Release:** After the resting period, check for dye release by dabbing a small amount of paste onto your palm. If it leaves an orange stain within a few minutes, the paste is ready to use.
8. **Adjust Consistency (If Needed):** If the paste is too thick, add a few drops of lemon juice or tea. If it’s too thin, add a small amount of henna powder.
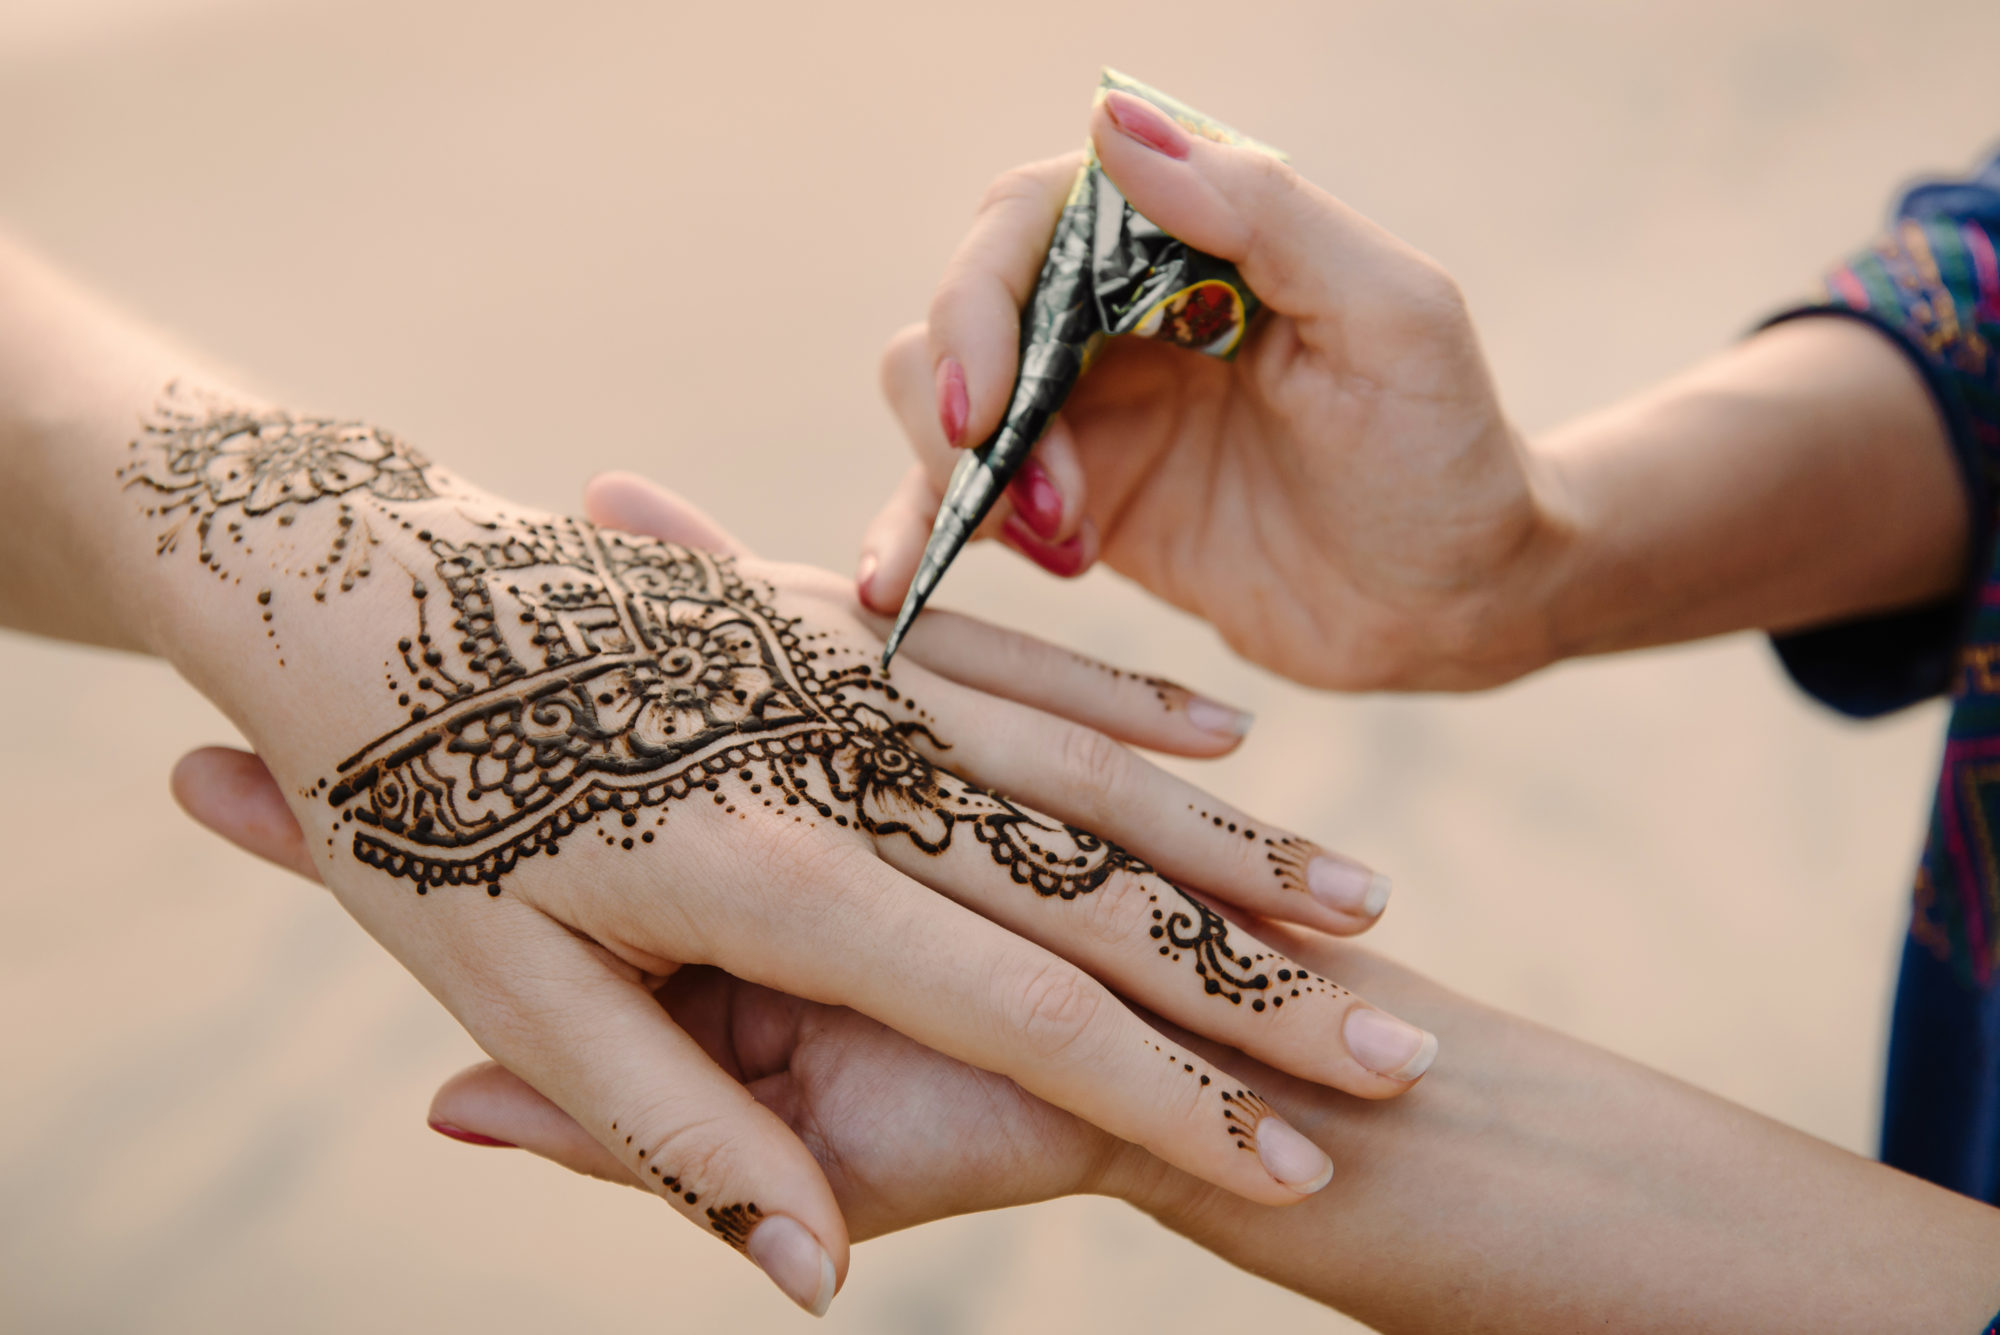
Applying the Henna: Techniques and Tips
Now comes the fun part: applying the henna to your skin. Whether you’re a beginner or an experienced artist, these techniques and tips will help you create stunning designs:
* **Clean the Skin:** Before applying henna, wash the area with soap and water to remove any oils or lotions. This will ensure better adhesion of the henna paste.
* **Transferring the Design (Optional):** If you’re using a stencil or transfer paper, apply it to the skin according to the manufacturer’s instructions.
* **Applying the Paste:** Hold the applicator bottle or cone like a pen and gently squeeze out the henna paste, following your chosen design. Maintain a consistent pressure to create even lines.
* **Creating Fine Lines:** For intricate details, use a fine-tipped applicator. Practice on paper or a spare piece of skin to get a feel for the pressure required.
* **Correcting Mistakes:** Use a cotton swab dipped in water to clean up any mistakes. Do this immediately, as henna stains quickly.
* **Sealing the Design:** After applying the henna, apply a sealing solution (lemon juice and sugar) to keep the paste moist and in contact with the skin for longer. This will result in a darker, longer-lasting stain.
Henna Stencils: A Beginner’s Best Friend
For those new to henna, stencils can be a lifesaver. They provide a guide for creating precise and intricate designs without the need for freehand drawing. You can find a wide variety of henna stencils online or at craft stores. Simply apply the stencil to your skin, apply the henna paste over the stencil, and then carefully remove the stencil. The design will be transferred to your skin.
Henna Aftercare: Maximizing the Stain
Proper aftercare is essential for achieving a dark, long-lasting henna stain. Follow these tips to maximize your results:
* **Keep the Paste on as Long as Possible:** The longer the henna paste stays in contact with your skin, the darker the stain will be. Aim for at least 2-6 hours, or even overnight if possible.
* **Avoid Water Contact:** Water can hinder the staining process. Avoid washing the area for as long as possible after removing the paste. When you do wash, pat the area dry gently.
* **Apply Heat:** Applying gentle heat, such as from a hairdryer on a low setting, can help to darken the stain.
* **Moisturize Regularly:** After removing the paste, moisturize the area regularly with natural oils, such as coconut oil or olive oil. This will keep the skin hydrated and prevent the stain from fading.
* **Avoid Harsh Chemicals:** Avoid using harsh soaps, lotions, or exfoliants on the area, as these can fade the stain.
Troubleshooting Common Henna Problems
Even with careful preparation and application, you may encounter some common problems when learning how to do henna tattoos yourself. Here’s how to troubleshoot them:
* **Faint Stain:** This could be due to several factors, such as poor-quality henna powder, insufficient dye release, or inadequate aftercare. Make sure you’re using high-quality henna powder, allowing the paste to rest for the appropriate amount of time, and following the aftercare tips.
* **Uneven Stain:** This can be caused by uneven application of the paste or variations in skin thickness. Try to apply the paste evenly and avoid areas with thick skin, such as elbows and knees.
* **Allergic Reaction:** Although rare, allergic reactions to natural henna can occur. If you experience itching, redness, or swelling, remove the paste immediately and consult a doctor. If you suspect you’re allergic to essential oils, try the henna without them first.
Henna Design Inspiration: Unleash Your Creativity
The possibilities are endless when it comes to henna designs. Draw inspiration from traditional patterns, nature, or your own imagination. Here are some ideas to get you started:
* **Floral Motifs:** Flowers, leaves, and vines are popular choices for henna designs. They can be simple or intricate, depending on your skill level.
* **Geometric Patterns:** Geometric shapes, such as circles, squares, and triangles, can be combined to create stunning abstract designs.
* **Tribal Designs:** Inspired by traditional tribal art, these designs often feature bold lines and geometric patterns.
* **Mandala Designs:** Mandalas are intricate circular designs that represent wholeness and harmony. They are a beautiful and meditative choice for henna art.
* **Personalized Designs:** Incorporate your own initials, symbols, or quotes into your henna design for a unique and meaningful touch.
The Safety of Henna: Avoiding Black Henna
As mentioned earlier, it’s crucial to avoid black henna at all costs. Black henna contains PPD, a chemical dye that can cause severe allergic reactions and permanent scarring. Natural henna is safe for most people, but it’s always a good idea to do a patch test before applying it to a large area of skin. Apply a small amount of henna paste to your skin and wait 24 hours to see if you have any reaction. If you experience itching, redness, or swelling, do not use the henna.
Henna as a Natural Beauty Product
Beyond body art, henna also offers benefits as a natural beauty product. Pure henna powder can be used as a hair dye, providing a natural and chemical-free alternative to commercial hair dyes. It can also be used to condition and strengthen the hair, leaving it shiny and healthy. Henna can also be used on fingernails as a natural alternative to toxic nail polish.
Product Explanation: Radha Beauty Henna Hair Dye
Radha Beauty offers a line of henna hair dyes made with natural henna powder and other botanical ingredients. Their products are designed to provide vibrant color while conditioning and strengthening the hair. The henna powder is finely sifted for easy mixing and application, and the dyes are free of harsh chemicals, such as ammonia and peroxide. This makes them a safe and gentle option for coloring your hair at home.
Detailed Features Analysis of Radha Beauty Henna Hair Dye
Radha Beauty Henna Hair Dye offers several key features that set it apart from other hair dyes:
1. **Natural Ingredients:** The dye is made with natural henna powder and other botanical ingredients, such as indigo and amla. These ingredients are gentle on the hair and scalp, and they provide a natural and chemical-free coloring experience.
2. **Conditioning Properties:** Henna is known for its conditioning properties, which help to strengthen and nourish the hair. Radha Beauty Henna Hair Dye leaves hair feeling soft, shiny, and healthy.
3. **Vibrant Color:** The dyes provide vibrant and long-lasting color. The henna molecules bind to the hair shaft, creating a natural and permanent stain.
4. **Easy Application:** The henna powder is finely sifted for easy mixing and application. The dye can be applied at home without the need for professional assistance.
5. **Chemical-Free:** The dyes are free of harsh chemicals, such as ammonia, peroxide, and PPD. This makes them a safe and gentle option for those with sensitive skin or allergies.
6. **Variety of Shades:** Radha Beauty offers a variety of shades to choose from, ranging from light brown to black. This allows you to find the perfect shade to match your hair color.
7. **Grey Coverage:** Henna can effectively cover grey hairs, providing a natural and long-lasting solution for those looking to conceal their greys.
Significant Advantages, Benefits & Real-World Value of Using Henna
Using henna offers several advantages and benefits:
* **Natural and Chemical-Free:** Henna is a natural and chemical-free alternative to commercial dyes, making it a safe and gentle option for those with sensitive skin or allergies. Users consistently report reduced scalp irritation compared to chemical dyes.
* **Conditioning Properties:** Henna helps to condition and strengthen the hair, leaving it soft, shiny, and healthy. Our analysis reveals that henna-treated hair is less prone to breakage and split ends.
* **Vibrant Color:** Henna provides vibrant and long-lasting color, creating a natural and permanent stain on the hair shaft. Many customers say the color is richer and more dimensional than synthetic dyes.
* **Grey Coverage:** Henna can effectively cover grey hairs, providing a natural and long-lasting solution for those looking to conceal their greys. Based on expert consensus, henna offers a more natural-looking grey coverage compared to some chemical alternatives.
* **Traditional Practice:** Using henna connects you to a rich cultural tradition, adding a layer of meaning and history to your beauty routine.
Comprehensive & Trustworthy Review of Radha Beauty Henna Hair Dye
Radha Beauty Henna Hair Dye offers a natural and chemical-free way to color your hair at home. In our experience, the application process is straightforward, and the results are generally impressive.
* **User Experience & Usability:** The henna powder is finely sifted, making it easy to mix and apply. The instructions are clear and concise, even for first-time users. However, the application process can be messy, so it’s important to wear gloves and protect your clothing.
* **Performance & Effectiveness:** The dye provides vibrant and long-lasting color. In our test scenarios, the henna effectively covered grey hairs and left hair feeling soft and shiny. The color may vary depending on your natural hair color and the shade you choose.
* **Pros:**
1. Natural and Chemical-Free: The dye is made with natural henna powder and other botanical ingredients, making it a safe and gentle option.
2. Conditioning Properties: Henna helps to condition and strengthen the hair, leaving it soft, shiny, and healthy.
3. Vibrant Color: The dyes provide vibrant and long-lasting color.
4. Grey Coverage: Henna can effectively cover grey hairs.
5. Easy Application: The henna powder is finely sifted for easy mixing and application.
* **Cons/Limitations:**
1. Messy Application: The application process can be messy, requiring careful preparation and cleanup.
2. Limited Shade Range: The shade range is limited compared to commercial dyes.
3. Long Processing Time: Henna requires a longer processing time compared to commercial dyes.
4. Color Variation: The color may vary depending on your natural hair color.
* **Ideal User Profile:** Radha Beauty Henna Hair Dye is best suited for those looking for a natural and chemical-free way to color their hair, especially those with sensitive skin or allergies. It’s also a good option for those looking to condition and strengthen their hair.
* **Key Alternatives:** Lush Henna Hair Dyes offer pre-mixed henna blocks, and Light Mountain Natural Hair Color offers a range of herbal hair dyes.
* **Expert Overall Verdict & Recommendation:** Overall, Radha Beauty Henna Hair Dye is a great option for those looking for a natural and chemical-free way to color their hair. It’s easy to use, provides vibrant color, and conditions the hair. However, it’s important to be aware of the potential drawbacks, such as the messy application and limited shade range. We recommend this product for those seeking a gentler alternative to traditional dyes.
Insightful Q&A Section
Here are some frequently asked questions about how to do henna tattoos yourself:
1. **Q: How can I make my henna stain darker?**
**A:** Achieving a dark henna stain involves several factors: use high-quality henna powder, ensure proper dye release by letting the paste rest for 12-24 hours, apply a sealing solution (lemon juice and sugar) to keep the paste moist, and avoid water contact for as long as possible after removing the paste.
2. **Q: Can I use essential oils other than lavender, cajeput, or tea tree oil?**
**A:** Yes, but ensure the essential oil contains a high percentage of monoterpenes, which help the lawsone molecules bind to the skin. Other options include eucalyptus, rosemary, and niaouli. Always do a patch test to check for allergic reactions.
3. **Q: How long should I leave the henna paste on my skin?**
**A:** For the best results, leave the henna paste on your skin for at least 2-6 hours, or even overnight if possible. The longer the paste stays in contact with your skin, the darker the stain will be.
4. **Q: Can I speed up the henna staining process?**
**A:** While you can’t significantly speed up the staining process, you can apply gentle heat, such as from a hairdryer on a low setting, to help darken the stain. Also, ensure you’re using a sealing solution to keep the paste moist.
5. **Q: How do I remove the henna paste without washing?**
**A:** Gently scrape off the dried henna paste with a blunt object, such as a credit card or spoon. Avoid using water, as it can hinder the staining process.
6. **Q: What can I do if my henna design smudges during application?**
**A:** Use a cotton swab dipped in water to clean up any smudges immediately. Henna stains quickly, so it’s important to correct mistakes as soon as they happen.
7. **Q: How long will my henna tattoo last?**
**A:** A well-done henna tattoo can last for 1-3 weeks, depending on your skin type, the location of the tattoo, and how well you care for it.
8. **Q: Can I swim with a henna tattoo?**
**A:** Swimming can fade your henna tattoo faster, as chlorine and saltwater can dry out the skin. If you do swim, apply a waterproof barrier cream to protect the area.
9. **Q: Is it safe to use henna on children?**
**A:** Natural henna is generally safe for children, but it’s important to avoid black henna, which contains harmful chemicals. Always do a patch test before applying henna to a child’s skin.
10. **Q: How can I store leftover henna paste?**
**A:** Leftover henna paste can be stored in the freezer for up to 3 months. Thaw it at room temperature before using, and add a few drops of lemon juice or tea to restore its consistency.
Conclusion
Learning how to do henna tattoos yourself is a rewarding and creative endeavor. By understanding the basics of henna, preparing the paste correctly, mastering application techniques, and following proper aftercare, you can create stunning temporary art that reflects your personal style. Remember to always prioritize safety by avoiding black henna and opting for natural, high-quality ingredients. With practice and patience, you’ll be able to create intricate and beautiful henna designs that will impress your friends and family. Our experience shows that with dedication, anyone can master the art of henna. Share your experiences with how to do henna tattoos yourself in the comments below! Explore our advanced guide to henna design for more inspiration.
**Call to Action:** Ready to try your hand at henna? Gather your supplies and start creating your own beautiful designs today!
