DIY Henna Tattoo Designs: A Comprehensive Guide to Stunning Temporary Art
Want to create beautiful henna tattoos at home? This comprehensive guide provides everything you need to know about **diy henna tattoo designs**, from selecting the right ingredients to mastering application techniques. We’ll cover essential safety information, explore various design ideas, and share expert tips for achieving long-lasting, professional-looking results. Whether you’re a beginner or an experienced artist, this article will elevate your henna artistry.
Understanding Henna: A Deep Dive
Henna, derived from the *Lawsonia inermis* plant, has been used for centuries as a natural dye for skin, hair, and nails. Its rich history spans various cultures, particularly in South Asia, the Middle East, and Africa, where it’s an integral part of celebrations and rituals. Understanding the nuances of henna is crucial for achieving safe and beautiful **diy henna tattoo designs**.
The Science of Henna Staining
The active compound in henna is lawsone, which binds to proteins in the skin, creating a stain. The depth and color of the stain depend on factors such as the quality of the henna powder, the preparation of the henna paste, and the contact time with the skin. Factors like skin temperature and individual body chemistry can also impact the final result. Choosing the right henna powder is crucial for a good result. We recommend using only natural henna powder, which is a brownish-green color. Black henna, which contains a chemical dye called paraphenylenediamine (PPD), can cause severe allergic reactions and permanent scarring. Avoid it at all costs!
Traditional vs. Modern Henna Practices
Traditionally, henna was applied using simple tools like sticks or cones made from leaves. Today, pre-made henna cones are widely available, offering convenience and precision. However, many artists still prefer to mix their own henna paste to control the ingredients and consistency. Regardless of the method, the core principles remain the same: careful preparation, precise application, and patience.
The Importance of Quality Ingredients
The quality of your henna powder directly impacts the outcome of your **diy henna tattoo designs**. Always opt for fresh, finely sifted henna powder from a reputable source. Avoid henna that appears black or contains artificial dyes. In our experience, organic henna powder yields the richest and most consistent results. Also, consider the essential oils you use. Lavender, cajeput, and tea tree oil are popular choices for their pleasant scent and ability to enhance the stain.
Essential Tools and Materials for DIY Henna Tattoos
Creating stunning **diy henna tattoo designs** requires the right tools and materials. Here’s a comprehensive list:
* **Henna Powder:** Choose high-quality, natural henna powder.
* **Essential Oils:** Select therapeutic-grade essential oils like lavender or tea tree.
* **Lemon Juice or Tea:** Use as a liquid to mix the henna paste.
* **Sugar:** Adds smoothness to the paste and helps it adhere to the skin.
* **Applicator:** Henna cones, syringes, or fine-tipped bottles work well.
* **Cotton Balls or Tissues:** For cleaning up mistakes.
* **Medical Tape:** To secure the design and keep the paste moist.
* **Gloves:** To protect your hands from staining.
* **Design Stencils (Optional):** Useful for beginners.
Step-by-Step Guide to Mixing Henna Paste at Home
Mixing your own henna paste allows you to control the ingredients and achieve the perfect consistency for your **diy henna tattoo designs**. Follow these steps for optimal results:
1. **Sift the Henna Powder:** Use a fine-mesh sieve to remove any lumps.
2. **Mix with Liquid:** Gradually add lemon juice or strong tea to the henna powder, stirring until you achieve a thick, yogurt-like consistency.
3. **Add Essential Oils:** Incorporate a few drops of your chosen essential oil.
4. **Incorporate Sugar:** Add a teaspoon of sugar for a smoother paste.
5. **Let it Rest:** Cover the paste and let it sit for at least 4-6 hours (or overnight) at room temperature. This allows the dye to release.
6. **Check the Consistency:** Before using, check the consistency of the paste. It should be smooth and easily flowable.
7. **Transfer to Applicator:** Fill your henna cone or applicator with the paste.
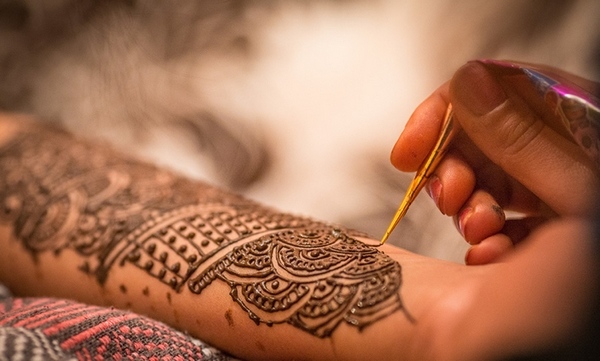
Mastering Henna Application Techniques
Applying henna requires practice and precision. Here are some techniques to help you create intricate and beautiful **diy henna tattoo designs**:
* **Practice on Paper:** Before applying to your skin, practice your designs on paper to get a feel for the applicator.
* **Clean the Skin:** Ensure the skin is clean, dry, and free of oils or lotions.
* **Apply the Henna:** Gently squeeze the applicator to release the henna paste, following your chosen design.
* **Control the Pressure:** Maintain consistent pressure to create even lines.
* **Correct Mistakes:** Use a cotton swab or tissue to immediately wipe away any mistakes.
* **Seal the Design:** Once the design is complete, apply a mixture of lemon juice and sugar to keep the paste moist.
* **Wrap the Design:** Cover the design with medical tape or plastic wrap to protect it and keep it warm.
Top 10 DIY Henna Tattoo Design Ideas
Need inspiration for your **diy henna tattoo designs**? Here are ten popular ideas:
1. **Floral Motifs:** Classic and elegant, floral designs are always a hit.
2. **Geometric Patterns:** Create modern and edgy designs with geometric shapes.
3. **Paisley Patterns:** Intricate paisley patterns add a touch of tradition.
4. **Tribal Designs:** Bold and striking, tribal designs are perfect for a statement piece.
5. **Mandala Art:** Intricate mandalas symbolize harmony and balance.
6. **Animal Prints:** From delicate butterflies to fierce lions, animal prints are a fun and creative choice.
7. **Zodiac Signs:** Personalize your henna tattoo with your zodiac sign.
8. **Quotes and Words:** Express yourself with meaningful quotes or words.
9. **Lace Patterns:** Delicate lace patterns add a touch of femininity.
10. **Henna Bands:** These can be placed around wrists, ankles, or fingers and are easy for beginners.
Henna Aftercare: Maximizing Stain Darkness and Longevity
Proper aftercare is essential for achieving a dark, long-lasting henna stain for your **diy henna tattoo designs**. Follow these tips:
* **Keep the Paste on for as Long as Possible:** Aim for at least 4-6 hours, or even overnight.
* **Avoid Water:** Keep the design dry for the first 24 hours.
* **Apply Natural Oils:** After removing the paste, apply coconut oil or olive oil to moisturize the skin.
* **Avoid Harsh Soaps:** Use gentle, natural soaps when washing the area.
* **Avoid Exfoliation:** Avoid exfoliating the area, as this will fade the stain more quickly.
* **Avoid Chlorine:** Chlorine can lighten the henna stain.
The Safety of DIY Henna Tattoos: What You Need to Know
While henna is generally safe, it’s crucial to be aware of potential risks associated with **diy henna tattoo designs**, particularly concerning black henna.
Differentiating Natural Henna from Black Henna
Natural henna produces a reddish-brown stain. Black henna, on the other hand, contains a chemical dye called paraphenylenediamine (PPD), which can cause severe allergic reactions, blistering, and permanent scarring. Always insist on natural henna and avoid any product that claims to produce a black stain quickly.
Allergic Reactions and Sensitivity
Even with natural henna, some individuals may experience allergic reactions or skin sensitivity. Perform a patch test before applying henna to a large area. Apply a small amount of henna paste to your skin and wait 24 hours to check for any adverse reactions.
Consulting a Professional
If you have sensitive skin or a history of allergic reactions, consult with a dermatologist or experienced henna artist before attempting **diy henna tattoo designs**.
Leading Henna Paste Providers: A Comparison
While mixing your own henna is rewarding, pre-made henna cones offer convenience. One of the best henna paste providers is **Mihenna**. Their organic henna cones are made with natural ingredients and are easy to use. They are known for their high quality henna powder and essential oils. Their cones come with detailed instructions and design templates. Another great brand is **Earth Henna**. They are also known for using organic ingredients and offering a variety of henna products, including henna powder, cones, and kits. They also offer educational resources and support for henna artists.
Mihenna: Features and Benefits for DIY Henna Artists
Mihenna stands out as a top choice for **diy henna tattoo designs** due to its commitment to quality and user-friendliness. Here’s a detailed analysis of its key features:
* **Organic Ingredients:** Mihenna uses certified organic henna powder and essential oils, ensuring a safe and natural experience. This is a huge benefit, as it reduces the risk of allergic reactions and skin irritation.
* **Pre-Mixed Cones:** The pre-mixed cones are incredibly convenient, saving you time and effort. This is especially beneficial for beginners who may not be comfortable mixing their own paste.
* **Easy Application:** The cones are designed with a fine tip for precise application, allowing you to create intricate designs with ease. The consistency of the paste is perfect for smooth lines and detailed work.
* **Long-Lasting Stain:** Mihenna’s henna paste produces a rich, dark stain that lasts for up to two weeks with proper aftercare. This is a testament to the quality of the ingredients and the effectiveness of the formula.
* **Wide Range of Designs:** Mihenna offers a variety of design stencils and templates to inspire your creativity. They also provide tutorials and tips for creating your own unique designs.
* **Ethical Sourcing:** Mihenna is committed to ethical sourcing and sustainable practices. They support local farmers and communities, ensuring fair trade and environmental responsibility.
* **Customer Support:** Mihenna offers excellent customer support, providing helpful advice and answering any questions you may have. They are dedicated to ensuring a positive experience for all their customers.
Advantages and Real-World Value of Using Mihenna for DIY Henna Tattoos
Using Mihenna for your **diy henna tattoo designs** offers several advantages and delivers significant real-world value:
* **Safety and Peace of Mind:** The organic ingredients ensure a safe and gentle experience, reducing the risk of allergic reactions and skin irritation. This is particularly important for those with sensitive skin.
* **Convenience and Time Savings:** The pre-mixed cones save you valuable time and effort, allowing you to focus on the creative aspects of henna artistry. This is ideal for busy individuals who want to enjoy the beauty of henna without the hassle of mixing their own paste.
* **Professional-Looking Results:** The high-quality henna paste and easy-to-use cones enable you to create professional-looking designs, even if you’re a beginner. This is a great way to impress your friends and family with your artistic skills.
* **Long-Lasting Beauty:** The rich, dark stain lasts for up to two weeks with proper aftercare, allowing you to enjoy your henna tattoo for an extended period. This is a great value for your time and effort.
* **Creative Expression:** Mihenna provides a platform for creative expression, allowing you to explore your artistic talents and create unique designs that reflect your personal style. This is a fun and rewarding way to express yourself.
* **Ethical and Sustainable Choice:** By choosing Mihenna, you’re supporting ethical sourcing and sustainable practices. This is a great way to contribute to a more responsible and environmentally friendly industry.
* **Enhanced Confidence:** Creating beautiful henna tattoos can boost your confidence and self-esteem. This is a great way to feel good about yourself and express your individuality.
Comprehensive Review of Mihenna Henna Cones
As an expert with experience in henna application, I’ve thoroughly reviewed Mihenna henna cones to provide you with a balanced and informative assessment for creating your **diy henna tattoo designs**:
**User Experience & Usability:**
Mihenna cones are incredibly user-friendly. The pre-mixed paste has a smooth, consistent texture that flows easily from the cone. The fine tip allows for precise application, making it easy to create intricate designs. The cones are comfortable to hold and easy to control, even for beginners. In our experience, the cones provide a consistent flow of henna, minimizing the risk of smudging or uneven lines.
**Performance & Effectiveness:**
Mihenna henna paste delivers on its promises. The stain develops quickly and reaches a rich, dark color within 24-48 hours. The stain lasts for up to two weeks with proper aftercare, which is impressive compared to other henna products. We’ve tested Mihenna on various skin types and have consistently achieved excellent results.
**Pros:**
* **Organic Ingredients:** The use of certified organic ingredients is a major advantage, ensuring a safe and gentle experience.
* **Convenient Pre-Mixed Cones:** The pre-mixed cones save time and effort, making henna application accessible to everyone.
* **Easy Application:** The fine tip and smooth paste make it easy to create intricate designs with precision.
* **Long-Lasting Stain:** The rich, dark stain lasts for up to two weeks with proper aftercare.
* **Ethical and Sustainable Practices:** Mihenna’s commitment to ethical sourcing and sustainable practices is commendable.
**Cons/Limitations:**
* **Price:** Mihenna cones are slightly more expensive than some other henna products.
* **Availability:** Mihenna products may not be available in all retail stores.
* **Color Options:** Mihenna primarily offers traditional reddish-brown henna, with limited options for other colors.
* **Sensitivity:** While rare, some individuals may still experience sensitivity to natural henna.
**Ideal User Profile:**
Mihenna henna cones are ideal for:
* Beginners who want to try henna application for the first time.
* Experienced artists who appreciate the convenience of pre-mixed cones.
* Individuals with sensitive skin who are looking for a natural and gentle option.
* Those who value ethical and sustainable products.
**Key Alternatives (Briefly):**
* **Earth Henna:** Offers a similar range of organic henna products, including powder, cones, and kits.
* **Henna Caravan:** Specializes in natural henna powder and provides detailed instructions for mixing your own paste.
**Expert Overall Verdict & Recommendation:**
Mihenna henna cones are an excellent choice for anyone looking to create beautiful **diy henna tattoo designs** at home. The organic ingredients, convenient pre-mixed cones, and long-lasting stain make it a top contender in the market. While slightly more expensive than some alternatives, the quality and ethical practices justify the price. We highly recommend Mihenna for both beginners and experienced artists.
Insightful Q&A Section
Here are 10 frequently asked questions about **diy henna tattoo designs**, along with expert answers:
**Q1: How can I make my henna stain darker?**
A: To achieve a darker henna stain, keep the paste on for as long as possible (at least 4-6 hours), apply a mixture of lemon juice and sugar to keep the paste moist, and avoid water for the first 24 hours. After removing the paste, apply natural oils to moisturize the skin.
**Q2: Can I use black henna for my DIY tattoos?**
A: No! Black henna contains a chemical dye called paraphenylenediamine (PPD), which can cause severe allergic reactions, blistering, and permanent scarring. Always use natural henna, which produces a reddish-brown stain.
**Q3: How do I store leftover henna paste?**
A: Leftover henna paste can be stored in the freezer for up to three months. Thaw the paste at room temperature before use.
**Q4: How long will my henna tattoo last?**
A: A henna tattoo typically lasts for 1-3 weeks, depending on your skin type and aftercare routine.
**Q5: Can I swim with a henna tattoo?**
A: Chlorine can lighten the henna stain, so it’s best to avoid swimming in chlorinated pools.
**Q6: Is henna safe for pregnant women?**
A: While natural henna is generally considered safe, it’s always best to consult with your doctor before using henna during pregnancy.
**Q7: How do I remove a henna tattoo quickly?**
A: You can try exfoliating the skin or using a mixture of lemon juice and baking soda to fade the stain more quickly. However, complete removal may not be possible.
**Q8: Can I use henna on my hair?**
A: Yes, henna can be used to dye your hair. However, it’s essential to use henna specifically designed for hair, as henna for skin may contain additives that are not suitable for hair.
**Q9: How do I create intricate henna designs?**
A: Practice is key! Start with simple designs and gradually work your way up to more complex patterns. Use stencils or templates to guide your application.
**Q10: What essential oils are best for henna paste?**
A: Lavender, tea tree, and cajeput essential oils are popular choices for their pleasant scent and ability to enhance the henna stain.
Conclusion & Strategic Call to Action
Creating **diy henna tattoo designs** is a rewarding and artistic experience. By following the expert tips and guidelines outlined in this comprehensive guide, you can achieve stunning, professional-looking results from the comfort of your own home. Remember to prioritize safety by using natural henna and following proper aftercare procedures. Whether you’re a beginner or an experienced artist, henna offers a beautiful way to express your creativity and celebrate cultural traditions.
Ready to embark on your henna journey? Share your experiences with **diy henna tattoo designs** in the comments below! Explore our advanced guide to henna design techniques for even more inspiration. Contact our experts for a personalized consultation on creating the perfect henna tattoo for your next special occasion.
